

VOTE
the big flip!
Pg 3
Vote for your favourite from THE BIG FLIP projects below!
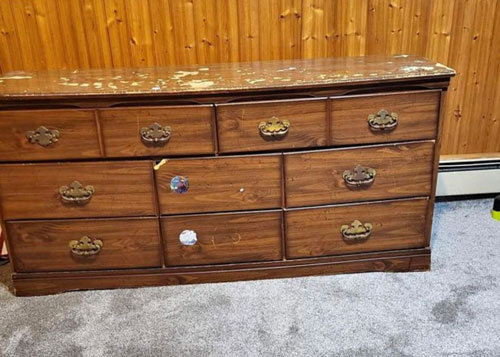
23. Kathy MacKay


This piece was bought from the Restore in Charlottetown, PEI
I bought it with great intentions, however it sat in my garage until the day I found out a dear friend was starting all over… with no furniture, no place to live, it wasn’t long before she found a sweet apartment but still no furniture! The light came on in my head and I dug out the old dresser! The rest is history, she lives her dresser and all the furniture she received from friends and family!
A labour of Love, for sure…. I hope you like it
24. Cheryl Cassidy

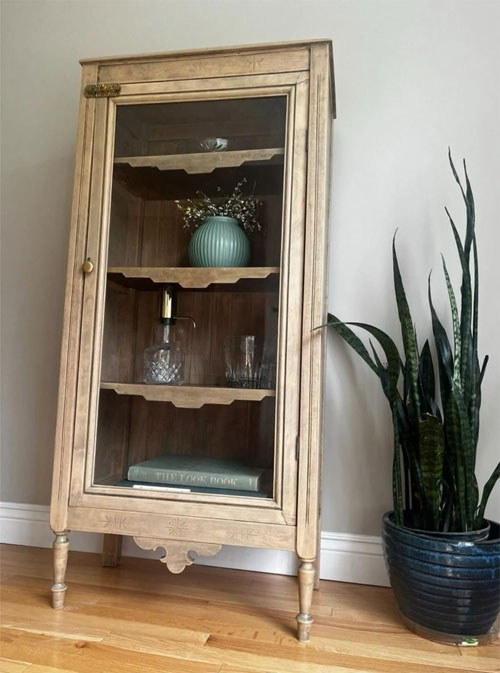
Heirloom Uncovered: A Vintage Cabinet from Caraquet Gets a Raw Wood Revival
This project was extra special—restoring a family heirloom cabinet originally from Caraquet, New Brunswick. The goal: strip off the old paint and uncover the story hidden underneath. And wow—what a surprise!
Beneath the yellow and white layers was a beautiful mix of what I think is a walnut veneer and what I believe is hand-carved poplar(or birch?)wood, paired with a wonderfully aromatic cedar backboard. The scent alone brought this piece to life before I even got to the finish!
Once we uncovered the wood grain, the decision was clear—I wanted a natural, raw wood finish to show off the cabinet’s heritage and craftsmanship. Now it’s ready to spend its next chapter glowing with vintage charm and a fresh blonde-and-brass glow.
Process:
-Degreased with Simple Green
-Removed shelving and glass for full access & reinforcement
-Stripped paint with Smart Strip, rinsed with denatured alcohol
-Sanded with 180 and 220 grit
-Filled imperfections with wood filler, then re-sanded
-Toned with a 1:5 paint wash using Fusion Mineral Paint (Algonquin)
-Added new shelf supports and secured decorative fronts
-Created new decorative corner using leftover veneer
-Sprayed with water-based polyurethane (satin)
-Added a brass knob to complement the original brass lock
Whether it was once a display cabinet, dining hutch, or budget beauty—it’s now a statement piece, full of warmth and story.
25. Angela Gilbert


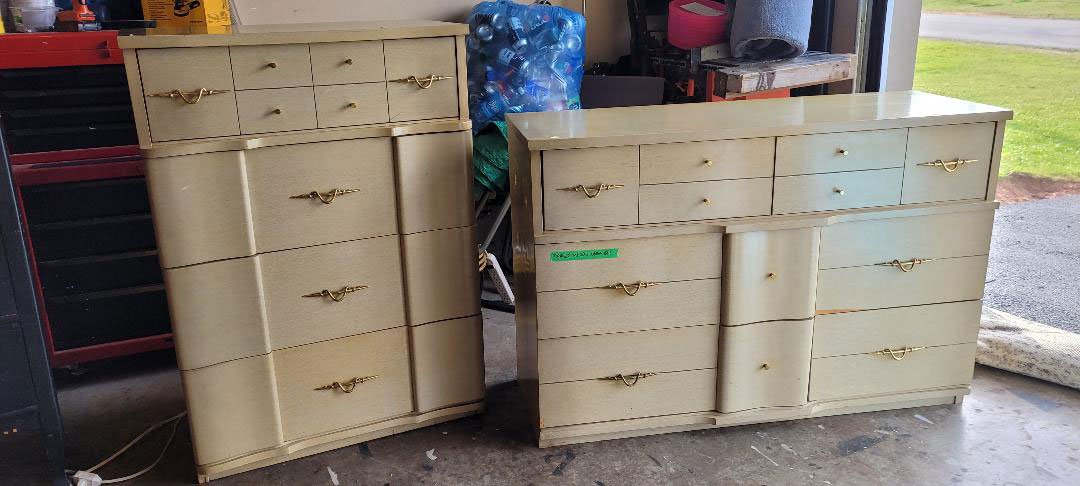
I found both pieces of furniture on Facebook marketplace for free from two different people. They were pretty beat up. I enjoy giving new life to old furniture that would typically end up in a dump. I needed a bar in my home and decided to turn these two random pieces into my bar by joining them together. The paint for the project was kicking around my house. I mixed a few colors of paint together to get the colors I wanted. The fabric for the pull out bin was left over from another project I had done in my house. I used a hot glue gun to wrap up a very sturdy cardboard box with the fabric, then added the original hardware to it from the bureau. I had a can of Rustoleum spray paint left over from another project and used it to spray paint all the original hardware which I reused. I needed two more knobs and found those kicking around my junk drawer. So this project basically was a free project and cost me my time only. Re working furniture is very relaxing and I enjoy doing it. I had to sand it all down, prime it with Behr primer. I did two coats of primer. I then painted it, two coats of paint. A few holes needed to be filled with wood filler as well. One drawer was beyond repair and that is where I added the pull out fabric covered bin. I knocked off the tiny bottom shelves on the top piece of furniture to open it up more. I really love how my project turned out.
26. Adam Walsh

I found this set at Restore PEI, a pair of tired mid-century dressers, yellowed with age and weighed down by outdated hardware. But their bold, sculptural lines had real potential. I set out to completely reimagine them as modern statement pieces that blend vintage character with fresh elegance.
The process began by disassembling every single piece and doing some reparation. I sanded away the old finish through a long sanding, revealing the beautiful natural wood underneath. The curved vertical panels were stained to enhance their warm grain, as well as some details. The body was primed and painted in a deep matte black to create a striking contrast that modernizes the silhouette.
Everything was sealed with a durable matte topcoat for a smooth finish. I replaced the original hardware with brushed gold handles and knobs, modern and minimal, to add just the right touch of sophistication.
My goal was to let the form speak and draw attention to the flowing lines and graphic symmetry. The result is an elegant duo, totally unique, and perfectly suited for an eco-conscious and design-forward home.
27. Guillaume Lebreton


I picked up this dresser on Marketplace and was immediately drawn to the bold design of the top drawers. Those sculptural blocks had so much character, and I knew they deserved to be the centerpiece of a fresh new look.
The piece needed quite a bit of love. I did some structural repairs, a lot of sanding, and gave it a complete refinishing inside and out. The drawer fronts and legs were stripped and stained to bring out the warmth of the wood grain, while the rest of the body got a deep matte black finish to create contrast and let the lines shine.
The result is a super clean, sculptural piece that respects its mid-century modern roots while bringing it into a more current, design-forward look. It feels fresh, a little edgy, and totally unique.
28. Samantha Doucette - Entry #1


I picked this piece up from an old farmhouse in St. Peter's. The owner was 5 months pregnant and inherited both a farmhouse filled with furniture and belongings, and an entire farm. The dresser had a thick paint treatment over it, and when removed by sanding, I learned it was made of birch, and suspect that it might have been handmade at that very farm.
My vision for the dresser was a blend of modern and vintage, and with a fun element of color. I knew I wanted to modernize this dresser but also keep as much of the original wood grain and charming features as I could. The original handles (pictured), however, were made of very thin metal, quite bent out of shape, and two were missing. I chose to stain the side panels and drawer fronts, using a custom blend of Behr water based stains, and sealed with polyurethane for durability. There were many stains on the top of the dresser that could not be removed, so I decided to continue the paint color to the top of the dresser. I selected the color "Black Elegance" by Behr paints, its a very deep, almost black, purple. I chose new handles that felt modern but had some antique charm to them as well. As a lifelong painter, I decided to try something new and hand-painted a floral pattern on the sides of the drawers. It gives it a fun pop of excitement, without overwhelming the piece, and makes it one of a kind!
29. Samantha Doucette - Entry #2


This set of plant stands came together in a great way. The inspiration for these came from both function and style. I needed more space for plants where they could be away from my puppy's mischief, and I wanted to incorporate a design trend I had heard about. It's essentially "Your room should have one unexpected pop of red", I really liked that concept and looked around and saw no red items in my living space.
The small piece is from the ReStore, and the tall piece is from a farmhouse is St. Peters. It was being used as a cat's scratching post and had yards upon yards of twine and glue wrapped around it. The small piece from the ReStore was a simple sand and paint. The tall piece took hours upon hours with a scraper in one hand, and a heat gun in the other. I finally managed to get all of the twine removed, and then used acetone to help get rid of some of the stubborn glue left behind. Both pieces are painted using a very economical choice, a sample can (a furniture flippers best friend) of Behr paint in the color "Rumors".
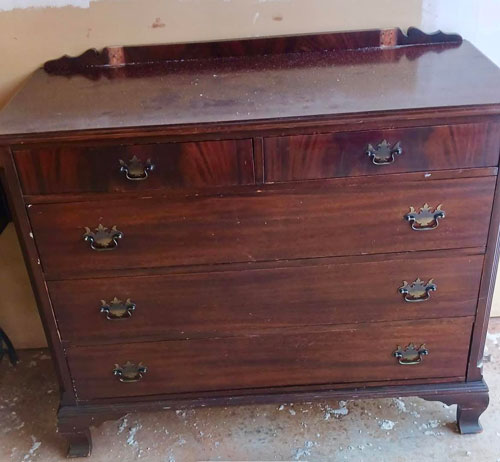
30. Chris Spenceley


I bought this piece as part of a set at an auction. My son is as getting into a new home so I refinished this piece for him. I first used a refinisher on the dresser (Circa 1850 Paint and Varnish Remover) to take off the original applied finish, filled any veneer damage in the carcass with filler and sanded it blend in, then painted the body with black Rustoleum Ultracover premium latex paint. The drawer fronts were sanded and stained with Minwax semitransparent red oak stain and followed up with Watco Black Walnut Danish oil.
31. Robin Vermette

It is a solid mixed wood piece with some mahogany and walnut wood veneer. It is a vintage dresser. I only buy wood furniture. It was not in horrible shape. There were scratches in the finish, deeper scratches on the top. I first stripped the two top drawers and the top of the dresser with a chemical stripper but the scratches on the top were deeper so I did have to sand the top. Because of its vintage, it wasn't really "fitting in" style-wise so I decided to do a paint/stain combo but then I found it still a little plain so I took it one step further and decided to do a raised stencil. The paint I used was chalk paint which is much easier on the environment and the lungs as well. Because the plaster I used for the stencil is water suable, I had to spray a coat of varnish over it before I could paint it, otherwise the plaster would have mixed in with the chalk paint. The last step was wax. I put wax over all the painted parts and I put polyurethane over the wood parts. There are three types of wax on this. First a liquid wax which keeps it from being chalky feeling. Then, after that dried through, I used a clear cream wax with some black wax. I wanted to add some depth to the green and to highlight some of the stencil work, which is why I used black wax. On its own, black wax can stick to painted wood and look like black smears so it's important to use it was a clear wax so that the black slides smoothly and doesn't all stick in one area.
Because I am in the house alone much of the time while I am working, it was harder to get a picture of me in "the middle" of it. So, I have a before photo, a mid stencil photo, a photo of me doing the clear and black wax treatment and then a finished photo.